Case Study: NCBI Bookshelf / JATS-like Data
The demonstration data is based on the public NCBI Bookshelf title Advances in Patient Safety: From Research to Implementation. The local file aps_NBK20452.jats.ocf is used as a realistic example package. It contains a large XML document, many media assets, metadata and validation reports.
The historical source model is relevant. NCBI documents the Book Tag Set as a DTD-based vocabulary for textbook and monograph content. The Book Tag Set was built from the NLM/JATS family of modules and was used for NCBI Bookshelf content. Version 3.0 of the Book DTD was released on 21 November 2008, and NCBI provides the DTD as book3.dtd. NCBI also documents Bookshelf harvesting formats and current submission requirements, including the preference for BITS in modern workflows.
This is exactly the type of situation encountered in real migrations. The archive is not random XML. It was created against a documented, public model. But the future production system still should not blindly adopt the complete old DTD. The broad standard is useful as a reference point; the new publishing process needs a controlled subset.
In this example, the target is a JATS-style sub-schema for publication. That means we remain aligned with a known standard vocabulary, but internally we use a smaller rule set: we simply do not use every element and every structure the standard would allow. That is normal in XML publishing, because no real project implements everything that could theoretically be permitted. Fortunately. The target subset says: these are the JATS structures we actually want, these are the values we accept, and these are the normalizations we require for manuscripts and backlist migration alike.
Step 1: Locate the Old DTD, but Do Not Stop There
The first technical step is to locate and document the old DTD. For NCBI Bookshelf, the relevant public DTD family is the NCBI Book Tag Set. In another project, this could be a local editorial DTD, a DocBook customization, a DITA specialization, a TEI customization or a proprietary content model.
Documenting the DTD gives the project a baseline. It tells us which vocabulary the files were supposed to follow, which modules were available, which element names were meaningful in the old environment and which constraints the legacy editors could rely on. This is important for traceability, especially when thousands of titles have to be migrated and the migration must be explainable years later.
However, the old DTD is only the upper boundary of the old world. It tells us what could occur, not what actually occurs. In a large library, most files use only a subset of the DTD. Some optional structures never appear. Some elements appear only in old projects. Some attributes are technically allowed but semantically inconsistent. Some values are project-specific conventions that were never formalized. Therefore the DTD is not enough for designing the new XSD.
The migration team should preserve the old DTD as documentation and use it as a reference, but the new schema should be derived from the real corpus and curated for the target process.
Step 2: Analyse the Corpus with XQuery or BaseX
Before designing the target XSD, load the corpus into an XML database such as BaseX. This makes it possible to ask questions across thousands of files. The goal is not only to count elements. The goal is to discover modelling patterns, legacy exceptions and quality risks.
Useful analysis questions include:
- Which elements occur at all, and how often?
- Which elements occur only in a few legacy titles?
- Which attributes have uncontrolled value ranges?
- How are dates encoded?
- How are units encoded: 10cm, 10 cm, 10 cm, 10 centimeters?
- Are image paths relative, absolute, mixed, duplicated or broken?
- Which processing instructions exist, and which are obsolete?
- Are abbreviations, punctuation and microtypographic conventions consistent?
The demo query is stored in beispiele/xquery/corpus-analysis.xq. A representative excerpt looks like this:
xquery version "3.1";

declare namespace xlink = "http://www.w3.org/1999/xlink";

let $docs := collection("legacy-jats")
return
  <analysis>
    <element-inventory>{
      for $name in distinct-values($docs//* ! node-name(.))
      order by string($name)
      return <element name="{$name}" count="{count($docs//*[node-name(.) = $name])}"/>
    }</element-inventory>
    <unit-spacing>{
      for $hit in $docs//text()[matches(., '\d+(cm|mm|kg|%)')]
      return <hit source="{base-uri($hit)}">{normalize-space($hit)}</hit>
    }</unit-spacing>
  </analysis>
This stage changes the discussion. Instead of arguing abstractly about a huge DTD, the team can work with evidence: "Only these section types occur", "These date shapes must be normalized", "These image references are inconsistent", "These PIs are obsolete", "These units need editorial rules".
Step 3: Infer an Observed Schema with Trang
The next step is to create a first machine-generated schema from the real XML files. The James Clark tool for this task is Trang. Trang is a multi-format schema converter for XML. It can convert between RELAX NG, DTD and W3C XML Schema, and it can infer a schema from one or more XML example documents.
In a migration project, Trang is useful because it gives us an observed schema. This is not the final schema model. It is a technical summary of what the current documents require if all observed structures should remain valid.
trang -I xml -O xsd legacy-samples/*.xml generated/observed-from-data.xsdFor a DTD-to-XSD migration, Trang can also be used to convert a DTD to XSD as a comparison point:
trang -I dtd -O xsd old-model/book3.dtd generated/from-old-dtd.xsdBoth outputs are useful, but neither should be accepted uncritically. The DTD-derived XSD may be too broad because it reflects the whole old vocabulary. The XML-derived XSD may be too narrow or too accidental because it reflects only the sample set. The migration team compares both and then designs a curated schema.
Example Chapter: From XML Data to XSD with Trang
The XHTML exercise material shows the practical workflow in a compact form. It starts with a real XML instance and turns it into a first schema. That first schema is useful because it captures what the data looks like, but it still needs human schema work before it becomes a maintainable production model.
The local example files are stored in beispiele/trang-xhtml/:
- XHTML-BeispielDokument.xhtml: the sample XML data.
- 01-observed-from-data.xsd: the first schema that reflects the observed data.
- 02-curated-xhtml-subset.xsd: the manually improved schema.
1. Start with an XML instance
The XHTML sample is intentionally document-centred. It contains a root element, metadata in head, content in body, headings, lists, paragraphs, inline markup and a table. A shortened excerpt looks like this:
<html xmlns:xsi="http://www.w3.org/2001/XMLSchema-instance"
      xsi:schemaLocation="http://www.w3.org/1999/xhtml http://www.w3.org/MarkUp/SCHEMA/xhtml11.xsd"
      xmlns="http://www.w3.org/1999/xhtml">
  <head>
    <title>Titel</title>
  </head>
  <body>
    <h1 id="id1" style="color:red">
      <a href=""/>
      <b><i><sub/></i></b>
      <br/>
    </h1>
    <ul><li/></ul>
    <p id="id2"><a href=""/><b><i><sub/></i></b><br/></p>
  </body>
</html>
In a large migration, this would not be one file. It would be a representative set of files from the archive. The better the sample set, the more useful the observed schema becomes.
2. Let Trang infer the first XSD
Trang can infer an XSD directly from XML examples. For the XHTML exercise, the command is:
trang -I xml -O xsd XHTML-BeispielDokument.xhtml 01-observed-from-data.xsdWith several sample files, all input XML files are listed before the output file:
trang -I xml -O xsd samples/*.xml generated/observed-from-data.xsdThe result is deliberately close to the sample. For example, the observed schema may state that the body contains exactly the sequence found in the sample:
<xs:element name="body">
  <xs:complexType>
    <xs:sequence>
      <xs:element ref="xhtml:h1"/>
      <xs:element ref="xhtml:h2"/>
      <xs:element ref="xhtml:h3"/>
      <xs:element ref="xhtml:h4"/>
      <xs:element ref="xhtml:h5"/>
      <xs:element ref="xhtml:h6"/>
      <xs:element ref="xhtml:ul"/>
      <xs:element ref="xhtml:ol"/>
      <xs:element ref="xhtml:p"/>
      <xs:element ref="xhtml:table"/>
    </xs:sequence>
  </xs:complexType>
</xs:element>
This is correct for the example, but it is too narrow as a production model. It describes one document shape rather than the intended content model. That is why the generated schema is a starting point, not the final result.
3. Inspect the generated schema
The first review asks which parts are real rules and which parts are artifacts of the sample. In the XHTML exercise, the initial schema shows typical raw-inference issues:
- It captures a fixed order of headings and blocks because the sample used that order.
- It treats some values as weak types such as xs:NCName or xs:NMTOKEN because the sample values happened to fit those lexical forms.
- It repeats similar inline models instead of naming a reusable group.
- It makes some attributes required because they occurred in the sample, although the future model may need a different rule.
This review step is where schema design begins. The team decides which constraints represent editorial intent and which constraints are accidental.
4. Refactor the schema into reusable groups
The curated XHTML solution introduces groups for recurring content classes. This is the same design move we need in a publication migration: headings, block elements and inline elements become named structures that can be reused consistently.
<xs:group name="Titel">
  <xs:choice>
    <xs:element ref="h1"/>
    <xs:element ref="h2"/>
    <xs:element ref="h3"/>
    <xs:element ref="h4"/>
    <xs:element ref="h5"/>
    <xs:element ref="h6"/>
  </xs:choice>
</xs:group>

<xs:group name="inzeilig">
  <xs:choice>
    <xs:element ref="a"/>
    <xs:element ref="b"/>
    <xs:element ref="br"/>
    <xs:element ref="i"/>
    <xs:element ref="sub"/>
  </xs:choice>
</xs:group>
The body model can then refer to semantic groups instead of listing every concrete element in a fixed observed order:
<xs:element name="body">
  <xs:complexType>
    <xs:sequence>
      <xs:group ref="Titel"/>
      <xs:group ref="Block"/>
      <xs:element ref="table"/>
    </xs:sequence>
  </xs:complexType>
</xs:element>
5. Improve datatypes
The schema seminar material emphasizes one of the main reasons for moving from DTD to XSD: datatypes and value ranges. DTDs cannot distinguish a string from a decimal value, a date or a controlled language code. XSD can.
In the XHTML exercise, identifiers are improved from lexical string-like types to real XML IDs:
<xs:attribute name="id" use="required" type="xs:ID"/>For publication data the same principle is applied to dates, percentages, status values, language codes, ISBNs, currencies, file references and controlled editorial categories. This is where a migration becomes a quality improvement rather than a mechanical conversion.
6. Document the schema
The seminar material also introduces xs:annotation and xs:documentation. The curated XHTML schema uses this pattern to make the schema readable for humans and usable for generated documentation:
<xs:annotation>
  <xs:documentation>XHTML exercise schema</xs:documentation>
</xs:annotation>
In a migration project, documentation belongs directly in the schema wherever it explains modelling decisions: why a subset exists, why a value range was chosen, which legacy pattern was normalized, and which manuscript workflow depends on the type.
7. Validate, revise and repeat
The final step is iterative. Validate the sample files against the curated schema. When files fail, classify the reason: the XML may need migration, the schema may be too strict, or the corpus may contain a legacy exception that requires an explicit project decision. This feedback loop is the same loop shown in the migration pattern: findings refine the subset and the transformation.
Step 4: Curate the Target XSD
The curated XSD is the real migration target. It is where project decisions become executable. The XSD should be smaller than the old DTD where the old model was too broad, stricter where legacy data was ambiguous, and explicit where old conventions were only implicit.
The exercise material on XML Schema supports exactly this modelling process: start with structure, introduce named types, add simple type restrictions, use enumerations and patterns, and turn informal conventions into machine-checkable constraints. In the JATS case study, the local target schema is beispiele/schema/d2t-jats-subset.xsd.
One typical improvement is date normalization. The legacy XML uses separate elements:
<pub-date>
  <day>30</day>
  <month>07</month>
  <year>2026</year>
</pub-date>
The curated target schema can require a real ISO date:
<xs:simpleType name="iso-date">
  <xs:restriction base="xs:date"/>
</xs:simpleType>
Another improvement is unit normalization. Legacy data may contain widths in pixels, centimetres, percentages or plain text. The target subset can require percentage-based values only:
<xs:simpleType name="percentage">
  <xs:restriction base="xs:decimal">
    <xs:minInclusive value="0"/>
    <xs:maxInclusive value="100"/>
  </xs:restriction>
</xs:simpleType>
Section types can also be controlled. Instead of accepting arbitrary legacy labels such as Heading1, Heading2 or local style names, the target model defines a small editorial vocabulary:
<xs:simpleType name="controlled-sec-type">
  <xs:restriction base="xs:token">
    <xs:enumeration value="frontmatter"/>
    <xs:enumeration value="chapter"/>
    <xs:enumeration value="section"/>
    <xs:enumeration value="references"/>
  </xs:restriction>
</xs:simpleType>
This is why the migration is valuable. The output is not merely "old XML in new syntax". The output is a cleaner, smaller, better typed and more predictable production model.
Step 5: Transform the Old XML with XSLT
After the target XSD has been curated, the legacy files will often be invalid against it. That is expected. The schema describes the future state; the XSLT describes how to get there.
The stylesheet beispiele/xslt/legacy-jats-to-d2t-subset.xsl demonstrates typical migration rules. Publication dates are lifted into ISO form:
<xsl:template match="pub-date">
  <pub-date>
    <iso-date>
      <xsl:value-of select="format-number(number(year), '0000') || '-' ||
                            format-number(number(month), '00') || '-' ||
                            format-number(number(day), '00')"/>
    </iso-date>
  </pub-date>
</xsl:template>
Legacy section style information is converted to controlled section types:
<xsl:template match="sec">
  <sec>
    <xsl:copy-of select="@id"/>
    <xsl:attribute name="sec-type">
      <xsl:choose>
        <xsl:when test="lower-case(@specific-use) = 'heading1'">chapter</xsl:when>
        <xsl:when test="lower-case(@specific-use) = 'ref'">references</xsl:when>
        <xsl:otherwise>section</xsl:otherwise>
      </xsl:choose>
    </xsl:attribute>
    <xsl:apply-templates/>
  </sec>
</xsl:template>
Image references are normalized so that package-internal paths are predictable:
<xsl:template match="graphic">
  <graphic xlink:href="{replace(@xlink:href, '^(.*/)?([^/]+)$', 'images/$2')}">
    <xsl:if test="@width">
      <xsl:attribute name="width-percent"
        select="replace(@width, '[^0-9.]', '')"/>
    </xsl:if>
  </graphic>
</xsl:template>
For a large archive, this stylesheet becomes a library of migration decisions. Each template should be traceable: which old structure does it handle, what new structure does it produce, and which validation rule confirms the result?
Step 6: Orchestrate the Migration with XProc
XSLT transforms XML. A full migration pipeline has more responsibilities. It must select input files, run transformations, copy or rename assets, rewrite XML links, build a manifest, run validators, collect reports and create a package. This is orchestration work, and XProc is a natural technology for it.
A simplified XProc pipeline might look like this:
<p:declare-step name="migrate-title" version="3.0"
                xmlns:p="http://www.w3.org/ns/xproc">
  <p:input port="source" primary="true"/>
  <p:output port="result" primary="true"/>

  <p:xslt name="lift-to-subset">
    <p:with-input port="stylesheet" href="xslt/legacy-jats-to-d2t-subset.xsl"/>
  </p:xslt>

  <p:store href="package/content/aps_NBK20452.xml"/>
  <p:archive format="zip" href="output/aps_NBK20452.d2t-subset.ocf"/>
</p:declare-step>
In production, the XProc would have additional steps for image normalization, filename policies, link rewriting, manifest generation, XSD validation, Schematron validation, link checking and dashboard export. The important point is that the pipeline migrates a publication, not only one XML file.
What OCF Is and Why It Matters
OCF stands for Octopus Container Format. In practical publishing workflows, an OCF package is a ZIP-based container that keeps all files belonging to a publication together. The exact profile can differ by project, but the principle is stable: the XML document, images, metadata and processing reports are not scattered across arbitrary directories. They are packaged as one inspectable, transferable and validatable unit.
In the demonstration package, the OCF contains:
- manifest.xml: the inventory of files in the package.
- content/aps_NBK20452.xml: the publication XML.
- content/images/: PDFs and JPEGs referenced by the publication.
- meta/: package metadata.
- processing/validation/: validation reports such as SVRL, link checker output and summary files.
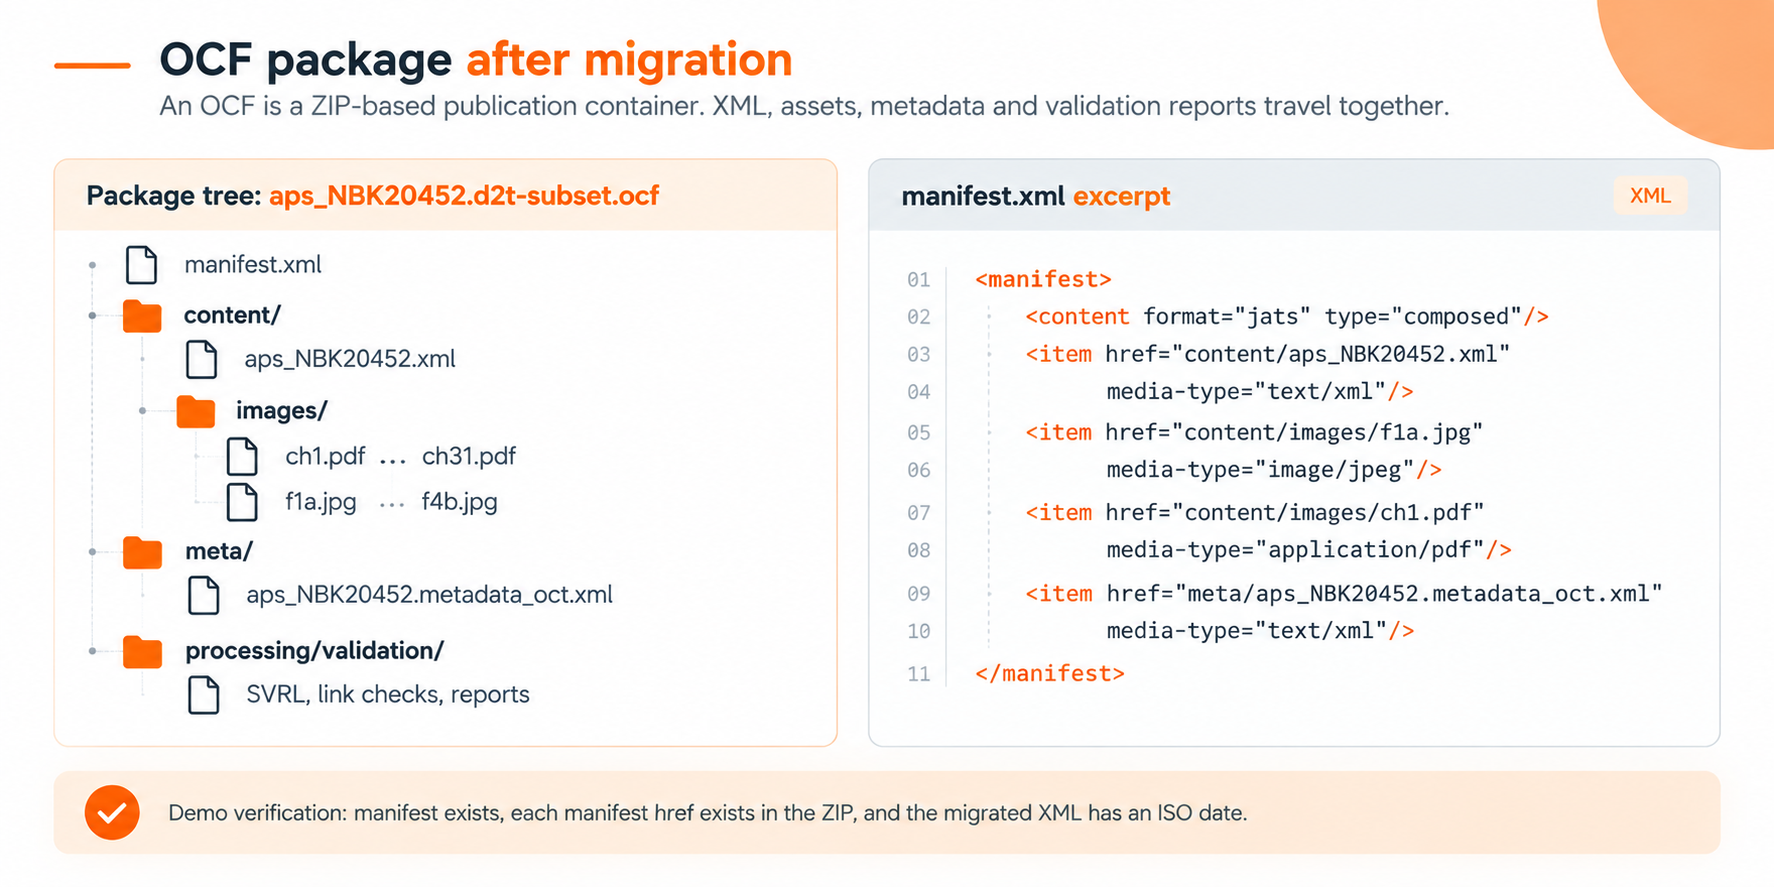
The manifest is essential because it makes the package machine-checkable. A pipeline can verify that every listed file exists. A link checker can compare XML references against package contents. A dashboard can show which title has which validation reports. A downstream rendering system can find the content file and the assets without guessing paths.
This is especially important in migrations because legacy images often live in inconsistent places. Some files may reference ../images/f1a.jpg, others graphics/f1a.jpg, others only f1a.jpg. A migration pipeline can normalize both the physical file location and the XML references. After migration, the rule is simple: publication images live in content/images/, and XML references point there.
Runnable Demo: Building the OCF Package
The demo includes an executable script at beispiele/scripts/build_ocf.py. It performs a small but complete package migration:
- Read the supplied legacy OCF.
- Load the legacy XML from content/aps_NBK20452.xml.
- Normalize publication dates into iso-date.
- Map legacy section styles to controlled sec-type values.
- Normalize graphic references to images/....
- Copy all media assets into the new package directory.
- Generate a new manifest.
- Create a new ZIP/OCF package.
- Verify that every manifest entry exists and that the migrated XML has a normalized date.
The command used for the local test was:
python beispiele/scripts/build_ocf.py \
  --source-ocf aps_NBK20452.jats.ocf \
  --source-xml beispiele/input/content/aps_NBK20452.xml \
  --out-dir beispiele/output
The tested result was:
created beispiele/output/aps_NBK20452.d2t-subset.ocf
copied_assets=63
The generated output package is stored at beispiele/output/aps_NBK20452.d2t-subset.ocf. The unpacked package used for inspection is stored in beispiele/output/package/.
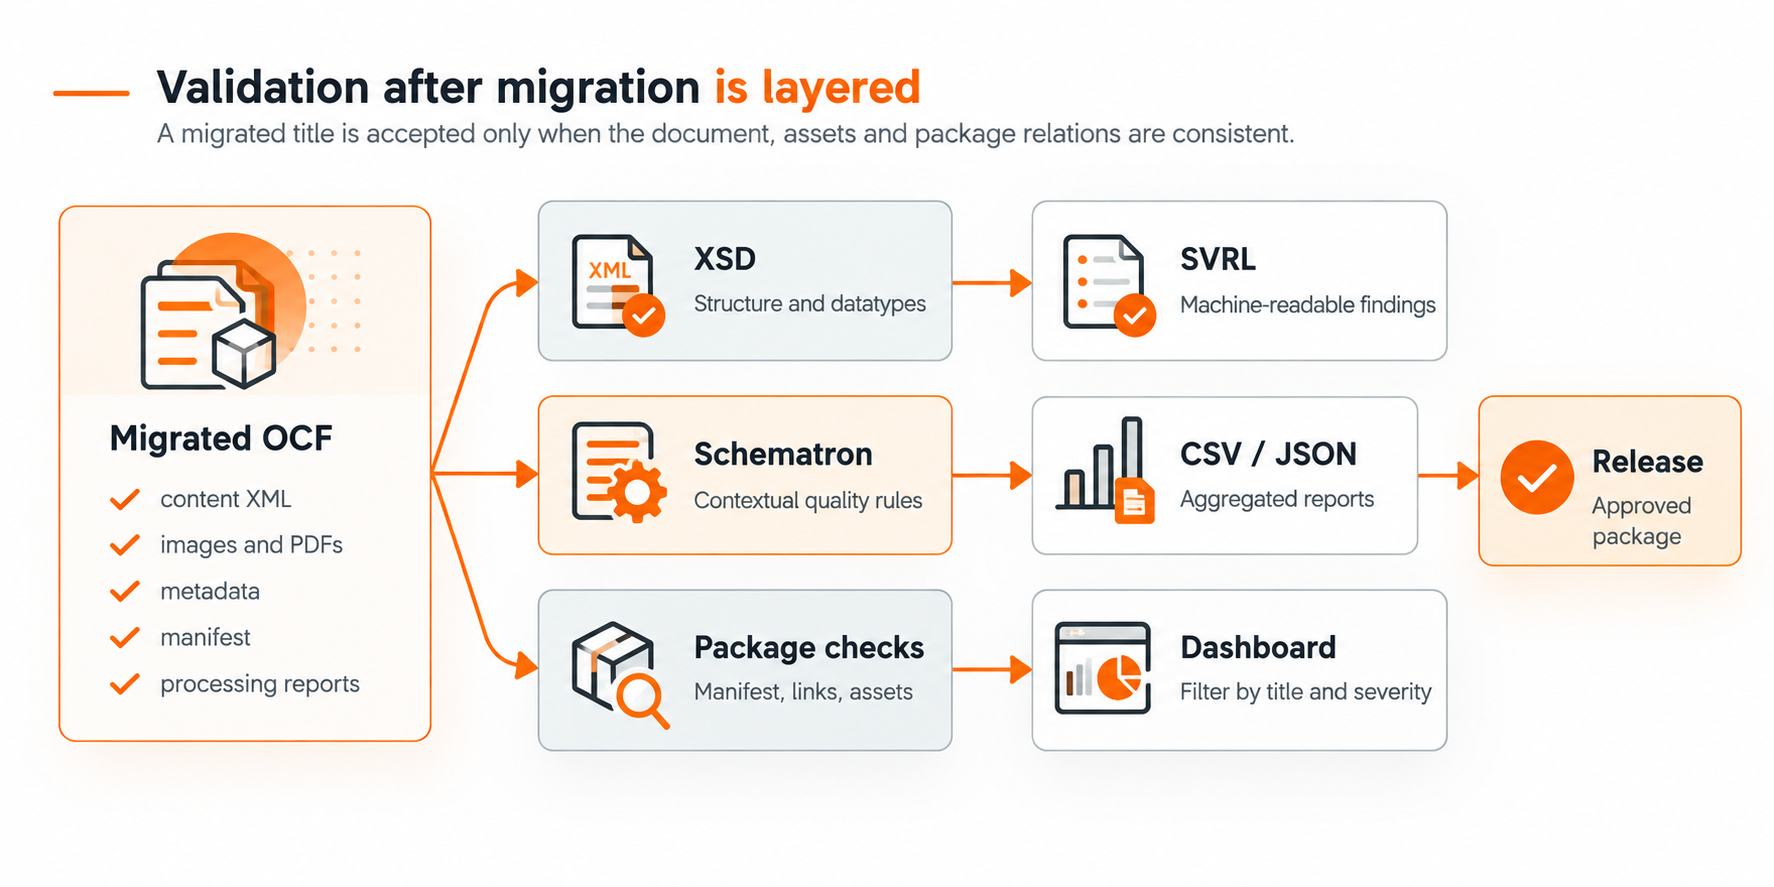
Step 7: Add Schematron for Migration Quality
XSD validates the target structure. Schematron validates migration quality and editorial rules. The demo file beispiele/schematron/d2t-jats-quality.sch checks rules such as normalized package image paths and percentage ranges:
<sch:rule context="graphic">
  <sch:assert test="starts-with(@xlink:href, 'images/')">
    Graphic references must point into the normalized images directory.
  </sch:assert>
  <sch:assert test="not(@width-percent) or (@width-percent ge 0 and @width-percent le 100)">
    Percent widths must be between 0 and 100.
  </sch:assert>
</sch:rule>
Schematron rules often emerge directly from corpus analysis. If BaseX queries show that unit spacing is inconsistent, add a Schematron report. If some processing instructions are invalid, add a Schematron rule. If abbreviations vary across the library, create a controlled check or a reporting rule. The migration becomes iterative: analysis finds patterns, XSLT fixes what can be fixed automatically, Schematron reports what needs review.