Tools
XML tools for special tasks
Background
In the Tools feature various tools for the
filtering of Word files
transformation of CSV files into XML files
display of XML code with Syntax Highlighting
automated transformation of entire folders and
documentation of Schema files
are provided.
Word 2 Generic
Transformation of Word to XML
Examples: Word to XML
The generated XML for markups from Word files
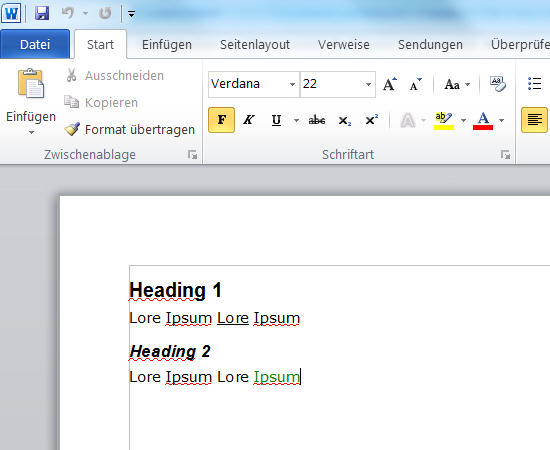
Tools → Word 2 Generic: The generated XML for markups from Word files
<?xml version="1.0" encoding="UTF-8"?>
<doc xmlns:d2t="http://www.data2type.de/word">
    <head>
        <doc-name>Markups_word.xml</doc-name>
        <uri>file:///C:/workspace/antillesXML/testFiles/Tools/Word2XML/source/Markups_word.xml</uri>
        <section-styles/>
    </head>
    <body>
        <p type="Heading_20_1">Heading 1</p>
        <p type="P1">Lore Ipsum <inline type="T1">Lore</inline> Ipsum</p>
        <p type="Heading_20_2">Heading 2</p>
        <p type="P1">Lore <inline type="T2">Ipsum</inline> Lore Ipsum</p>
    </body>
</doc>
The different paragraph and character formats from Word remain preserved. They are added on a <p> or an <inline> element as type attributes.
The generated XML for lists from Word files
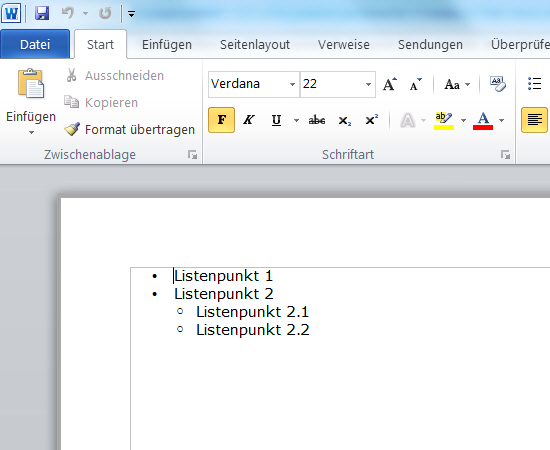
Tools → Word 2 Generic: The generated XML for lists from Word files
<?xml version="1.0" encoding="UTF-8"?>
<doc xmlns:d2t="http://www.data2type.de/word">
    <head>
        <doc-name>List_word.xml</doc-name>
        <uri>file:///C:/workspace/antillesXML/testFiles/Tools/
            Word2XML/source/List_word.xml</uri>
        <section-styles/>
    </head>
    <body>
        <ol>
            <li><p type="P1">Listenpunkt 1</p></li> <!-- en: List bullet 1 -->
            <li><p type="P1">Listenpunkt 2</p></li>
            <li>
                <ol>
                    <li><p type="P1">Listenpunkt 2.1</p></li>
                    <li><p type="P1">Listenpunkt 2.2</p></li>
                </ol>
            </li>
        </ol>
    </body>
</doc>
Lists are reduced to a simple basic structure which is inspired by the well-known structure of HTML documents.
The generated XML for tables from Word files
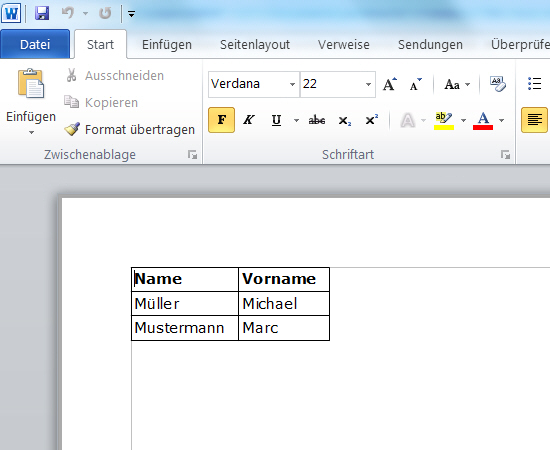
Tools → Word 2 Generic: The generated XML for tables from Word files
<?xml version="1.0" encoding="UTF-8"?>
<doc xmlns:d2t="http://www.data2type.de/word">
    <head>
        <doc-name>table_word.xml</doc-name>
        <uri>file:///C:/workspace/antillesXML/testFiles/Tools/
            Word2XML/source/table_word.xml</uri>
        <section-styles/>
    </head>
    <body>
        <table type="d2t:table">
            <thead type="d2t:thead">
                <tr type="d2t:tr">
                    <td type="d2t:td"><p type="P2">Name</p></td> <!-- en: Last name -->
                    <td type="d2t:td"><p type="P2">Vorname</p></td> <!-- First name -->
                </tr>
            </thead>
            <tbody type="d2t:tbody">
                <tr type="d2t:tr">
                    <td type="d2t:td"><p type="P1">Müller</p></td>
                    <td type="d2t:td"><p type="P1">Michael</p></td>
                </tr>
                <tr type="d2t:tr">
                    <td type="d2t:td"><p type="P1">Mustermann</p></td>
                    <td type="d2t:td"><p type="P1">Max</p></td>
                </tr>
            </tbody>
        </table>
    </body>
</doc>
Tables are also reduced to a simple basic structure which is inspired by the well-known structure of HTML documents.
Tab: Single
Transformations of Word files to XML
Here you can see how to generate a simplified XML format from a Word file.
- Generation of the Word file
How to prepare the Word file for the transformation:
Open the Word file in Microsoft Word.
Please note that it must be a Word version 2003 or higher.
Select the Save as... entry in the File menu.
→ The Save as dialogue appears.
Choose the path to the target folder in your file system.
Assign a unique name for the target document under File name.
Change of the file format.
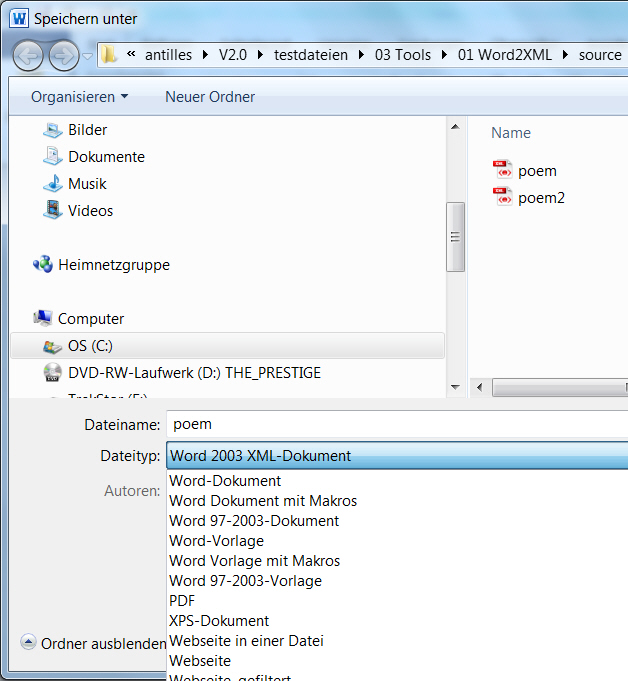
Select the Word 2003 XML document entry in the dropdown list behind File type.
Click Save.
Close the file in Word.
antillesXML is unable to access this file as long as it is opened in Word. Therefore antillesXML outputs an error message.
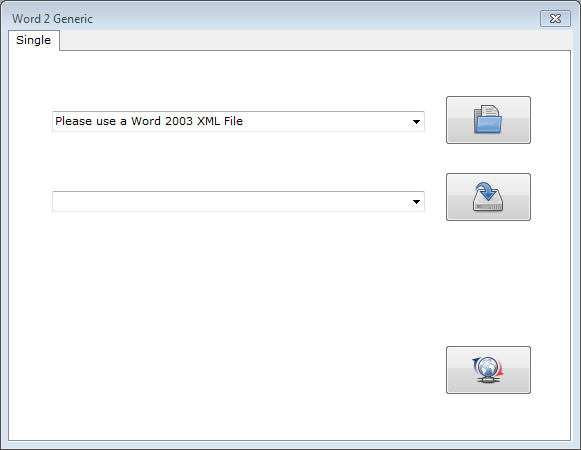
- Calling up the Word 2 Generic window
Select the Word 2 Generic entry in the Tools menu.
→ The Word 2 Generic window appears.
→ The Single tab is already selected by default with the first call.
- Selection of the input document
As input document you need a Word file saved as XML whose content shall be transformed into a simplified XML structure.
Press the
 button.
→ The Open dialogue appears.
Choose the path to the input document in your file system.
Click Open.
- Selection of the target document
As target document you need a XML file in which the content of the Word file shall be displayed in a simplified XML structure.
Press the
 button.
→ The Save as dialogue appears.
Choose the path to the target document in your file system.
Assign a unique name for the target document under File name.
Click Save.
- Starting the transformation
Press the
 button.
→ The target document has been written to the location selected by you.
In addition, the result of the transformation is shown in the Statistics window in the Results tab.
In case error messages occur during the transformation, they are displayed in the Statistics window in the Log tab.
Background
antillesXML offers the possibility to transform Word files into a predefined XML format. The Word files may contain any type of content and styles.
The resulted XML document concentrates on the essential information such as texts, lists, tables and makups.
The XML format into which the original Word file is transformed corresponds to a highly simplified version of the Word file. During this process, many, often unnecessary and disturbing structures are eliminated. The focus is on the essential.
Due to the significantly reduced structure, the generated XML file may be optimally used for further transformation processes.
CSV 2 XML
Transformation of CSV files to XML
Example: CSV to XML
The CSV file
Tools → CSV 2 XML: The CSV file
Last name;First name;Title;Street;Postcode
Müller;Michael;Herr;Müllerstr. 25;55435
Meier;Maja;Frau;Majastr. 45;44555
Tools → CSV 2 XML: The CSV file
The original, unformatted CSV file.
The generated XML format
Tools → CSV 2 XML: The generated XML format
<?xml version="1.0" encoding="UTF-8"?>
<csv>
   <row>
      <cell>Last name</cell>
      <cell>First name</cell>
      <cell>Title</cell>
      <cell>Street</cell>
      <cell>Postcode</cell>
   </row>
   <row>
      <cell>Müller</cell>
      <cell>Michael</cell>
      <cell>Herr</cell>
      <cell>Müllerstr. 25</cell>
      <cell>55435</cell>
   </row>
   <row>
      <cell>Meier</cell>
      <cell>Maja</cell>
      <cell>Frau</cell>
      <cell>Majastr. 45</cell>
      <cell>44555</cell>
   </row>
</csv>
The content of the CSV file has been transformed into a simply structured XML file.
Tab: Single
Transformation of CSV files to XML
Here you can see how to generate a XML file from a CSV file.
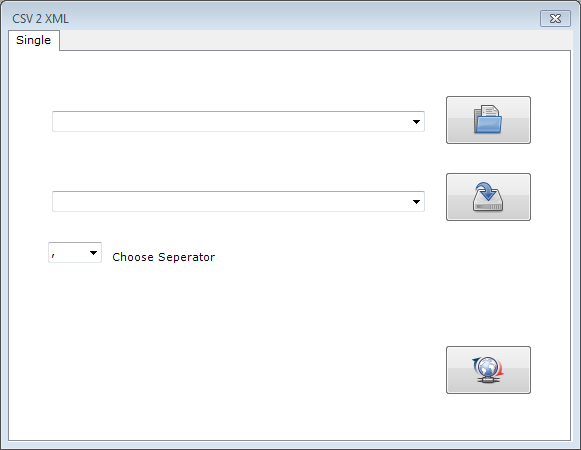
- Calling up the CSV 2 XML window
Select the CSV 2 XML entry in the Tools menu.
→ The CSV 2 XML window appears.
→ The Single tab is already selected by default with the first call.
- Selection of the input document
As input document you need a CSV file whose data shall be transformed into XML.
Press the
 button.
→ The Open dialogue appears.
Choose the path to the input document in your file system.
Click Open.
- Selection of the target document
As target document you need a XML file in which the data of the CSV file shall be prepared.
Press the
 button.
→ The Save as dialogue appears.
Choose the path to the target folder in your file system.
Assign a unique name for the target document under File name.
Click Save.
- Selection of the separator

Depending on the separator used in the CSV file, choose the appropriate option in the dropdown list before Choose Separator.
- Starting the transformation
Press the
 button.
→ The target document has been written to the location selected by you.
The result of the transformation is also shown in the Statistics window in the Results tab.
In case error messages occur during the transformation, they are displayed in the Statistics window in the Log tab.
Background
The CSV file format describes the structure of a text file for the storage or the exchange of simply structured data.
The transformation of CSV files into a XML structure is possible, if
for the separation of the data sets a line break occurs,
as separator for the individual data fields in the lines
a comma or
a semicolon
is used.
Further links regarding embedded CSV files:
RFC 4180: Common Format and MIME Type for Comma-Separated Values (CSV) Files
XML Syntax Highlighting
Syntax Highlighting of XML files
Tab: Single
Syntax Highlighting of XML files
Here you can see how to generate from a XML file a display of the XML code in HTML with Syntax Highlighting.
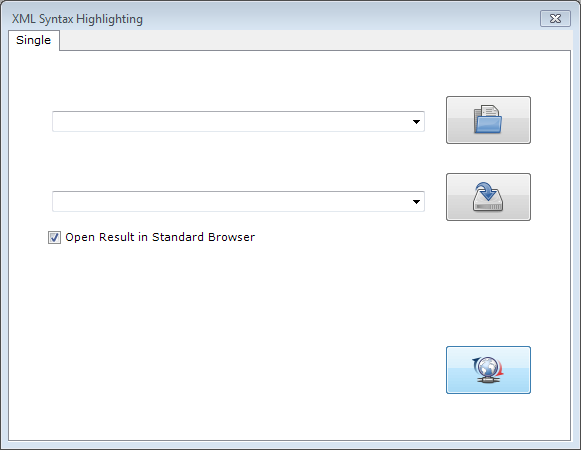
- Calling up the XML Syntax Highlighting window
Select the XML Syntax Highlighting entry in the Tools menu.
→ The XML Syntax Highlighting window appears.
→ The Single tab is already selected by default with the first call.
- Selection of the input document
As input document you need a XML file whose code shall be prepared visually.
Press the
 button.
→ The Open dialogue appears.
Choose the path to the input document in your file system.
Click Open.
- Selection of the target document
As target document you need a HTML file in which the XML code shall be prepared visually.
Press the
 button.
→ The Save as dialogue appears.
Choose the path to the target folder in your file system.
Assign a unique name for the target document under File name.
Click Save.
- Display of the result in the browser

Activate the check box before Open Result in Standard Browser.
→ During each transformation process, the target document will be additionally opened in the standard browser.
- Starting the transformation
Press the
 button.
→ The target document has been written to the location selected by you.
In addition, the result of the transformation is shown in the Statistics window in the Results tab.
In case error messages occur during the transformation, they are displayed in the Statistics window in the Log tab.
Background
Transformation of a XML file into a HTML display with Syntax Highlighting.
The generated HTML file contains the adaptable CSS code in the header.
The generated HTML code may be embedded in other HTML pages, e.g. for documentation purposes.
Hotfolder
Automated transformations of entire folders
Tab: XSLT
Automated transformations of entire folders
Here you can see how to transform automated files with XSLT into new output files.
Usually, they are already XML files.
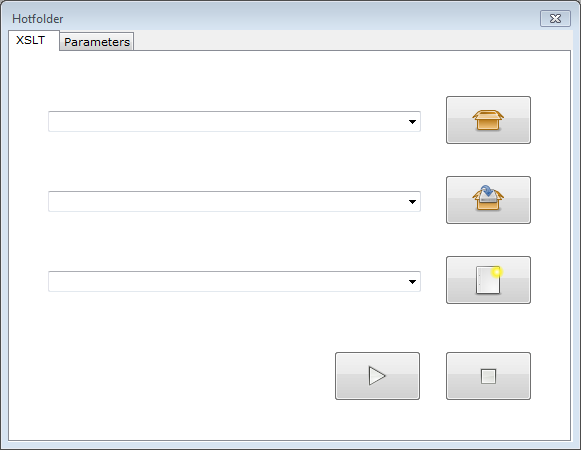
- Calling up the Hotfolder window
Select the Hotfolder entry in the Tools menu.
→ The Hotfolder window appears.
→ The XSLT tab is already selected by default with the first call.
If this is not the case, please select now the XSLT tab.
- Selection of the Hotfolder
As Hotfolder you need a folder which shall be monitored for changes and whose files shall be automatedly transformed.
Depending on the purpose of application and the XSL stylesheet used, the folder may consist of different forms of processible files.
Press the
 button.
→ The Search folder dialogue appears.
Choose the path to the Hotfolder in your file system.
Click OK.
- Selection of the output folder
As output folder you need a folder in which the output documents shall be stored.
Press the
 button.
→ The Search folder dialogue appears.
Choose the path to the output folder in your file system.
Click OK.
- Indication of the stylesheet file
As a stylesheet you need a XSLT file which transforms the files in the Hotfolder into the new output format.
Press the
 button.
→ The Open dialogue appears.
Choose the path to the stylesheet in your file system.
Click Open.
- Activation of the Hotfolder
Here you can see how to start a Hotfolder session.
Press the
 button.
→ The Hotfolder is active and is monitored. In case changes occur in this folder, the transformation processes will be automatedly initiated and the output documents will be written to the location selected by you.
In addition, the result of the transformation is shown in the Statistics window in the Results tab.
In case error messages occur during the Hotfolder session, they are displayed in the Statistics window in the Log tab.
Likewise, messages regarding the beginning and the end of the Hotfolder session are outputted.
- Deactivation of the Hotfolder
Here you can see how to end a Hotfolder session.
Press the
 button.
→ Now, the Hotfolder session has ended.
A message regarding the end of the Hotfolder session is displayed in the Statistics window in the Log tab.
Tab: Parameters
Automated transformations with passing of parameters
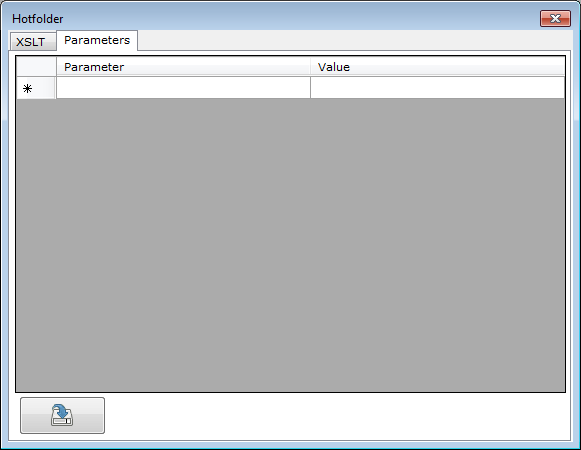
Here you can see how to pass parameters to a Hotfolder.
- Requirements for the passing of parameters
First select the XSLT tab in the Hotfolder window and there the required files or folders for the transformation process.
Then select the Parameters tab.
- Passing of the parameters
Tools → Hotfolder → Parameters →
<xsl:param>Parameters can be found in the XSLT stylesheet in the following form:
<?xml version="1.0" encoding="UTF-8"?>
<xsl:stylesheet version="2.0" xmlns:xsl="http://www.w3.org/1999/XSL/Transform">
 <xsl:param name="collection"/>
  <html>
   <body>
    <h1><xsl:value-of select="$collection"/></h1>
Here a parameter is declared as global element.
The argument for the parameter passed on by the XSLT processor is called up within the <h1> element.
Further links to the <xsl:param> element:
data2type: XML technologies → XSLT → XSLT 1.0 reference → param
element">w3schools: XSLT → <xsl:param> element
- Indication of the parameter values

The parameter names of the previously selected XSLT styesheet are listed in the left column under Parameter.

Enter the value to be passed on to the appropriate parameter in the right column under Value.
Saving of the parameter values
Press the
 button.
→ The values are passed on as arguments to the XSLT processor during the next transformation process.
Switch back to the XSLT tab and start the transformation.
Tools → Hotfolder → Parameters →
<xsl:param>The result of the paramater passing from our example:
<html>
 <body>
 <h1>data2type</h1>
The argument passed on during the transformation can be found as headline in the HTML code.
Background
A Hotfolder is a monitored folder in the file system. Changes in this folder lead to the fact that the deposited processes will be executed immediately.
- Updating files,
- Adding files.
Changes in the Hotfolder may be:
- Transformation of the files in the Hotfolder with an assigned XSLT stylesheet.
- Writing of the output documents into a target folder.
The deposited processes contain:
XSD Documentation
Documentation of Schema files
Tab: Single
Documentation of single schemata
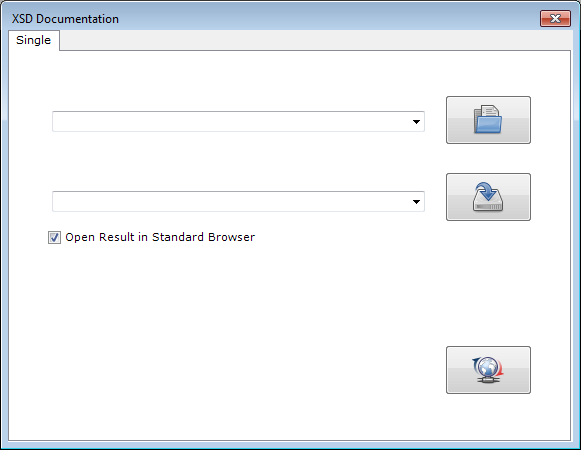
Here you can see how to generate a HTML documentation of a Schema file.
- Calling up the XSD Documentation window
Select the XSD Documentation entry in the Tools menu.
→ The XSD Documentation window appears.
The Single tab is already selected by default with the first call.
- Selection of the input document
As input document you need a Schema file whose components shall be documented and prepared visually.
Press the
 button.
→ The Open dialog appears.
Choose the path to the input document in your file system.
Click Open.
- Selection of the target document
As target document you need a HTML file in which the Schema file shall be documented and prepared visually.
Press the
 button.
→ The Save as dialogue appears.
Choose the path to the target folder in your file system.
Assign a unique name for the target document under File name.
Click Save.
- Display of the result in the browser

Activate the check box before Open Result in Standard Browser.
→ During each transformation process, the output document will be additionally opened in the standard browser.
- Starting the transformation
Press the
 button.
→ The target document has been written to the location selected by you.
In addition, the result of the transformation is shown in the Statistics window in the Results tab.
In case error messages occur during the transformation, they are displayed in the Statistics window in the Log tab.

